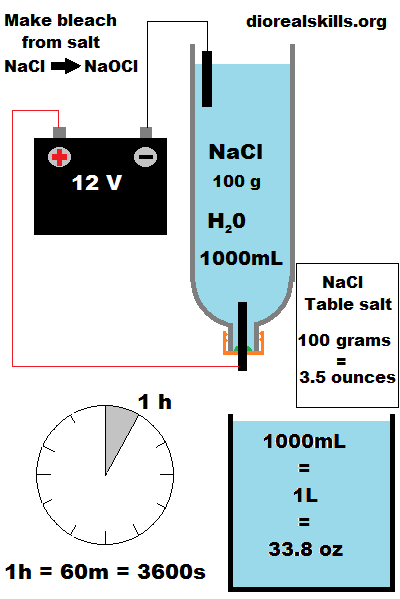
Make Sodium Hypochlorite AKA bleach

bleach making 2

NaOCl

Sodium Hypochlorite

bleach, it will damage the dye in fabrics but more importantly it will kill a wide variety of pathogens.
This makes bleach a very important substance for modern settled life. For any settled life the abilbity to create bleach could be a life saving skill.
Surprisingly beach is quite easy to make, the process does release some hazardous gasses such as Hydrogen gas and Chlorine gas, but if done in a well vested area this should not be a problem.

The basic chemistry

Chlorine gas if exposed to an alkaline solution will produce hypochlorites.

Cl2  +H2O  ==> ClO‾ + OH‾

NaCl + H20 ==>  Cl2 + H2 + NaOCl

For this reaction, where the chlorine is formed is important as we want it to have a long path to the surface to react with the water, so the chlorine producing electrode should be close to the bottom of the electrolysis container.
The hydrogen gas we don’t care about to much, so the negative electrode is close to the surface.

The container

<pic of chamber>

create chamber from plastic bottle

The electrode.

carbon graphite from a battery, larger in diameter is better.
wash to remove chemicals and plastics that may be on the surface, heating is an aceptable way to remove plastics.

Add to bottle cap by puncture. seal with candle wax.

The salt

the salt used should be NaCl, without added iodide which is common in some manufactured salt used for consumption.

some salt has anti caking agents, these should not cause a problem.

100 grams used

The water

avoid impurities
the water should be as clean as possible, distilled or rain water is preferred
1 liter used.

Impurities such as transition metals , copper, iron, manganese… will reduce the shelf life of the NaOCL
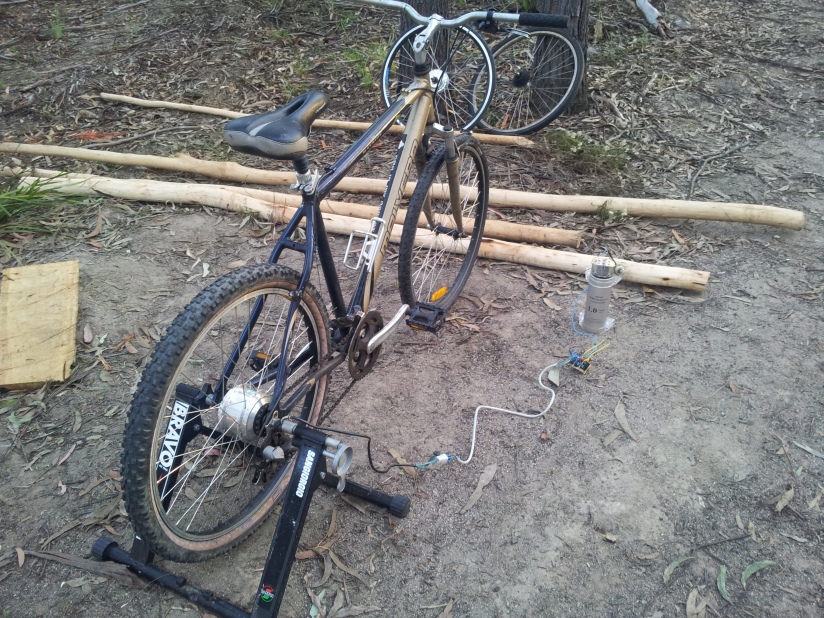
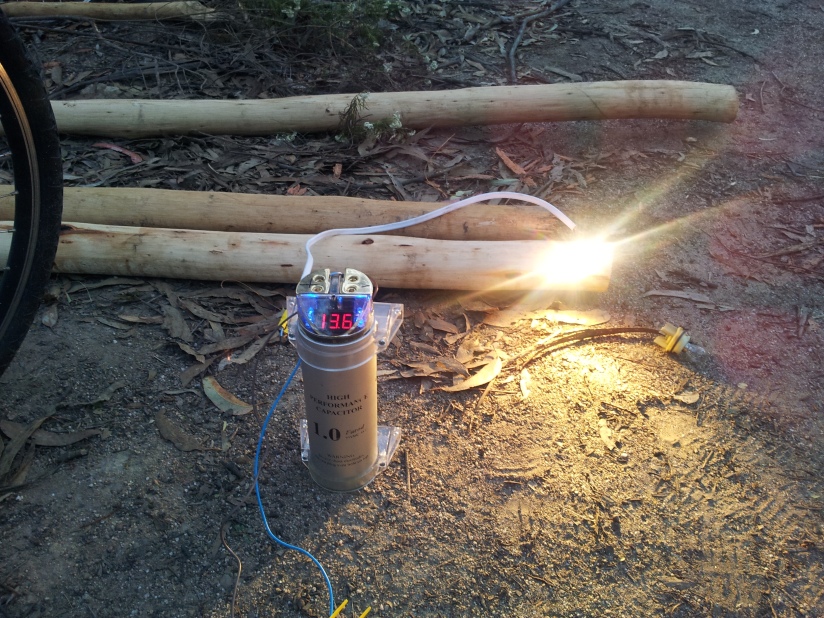
The power source

12V -24V DC
possible sources, car battery, solar panel, 8 x 1.5V batteries in series.

Time taken

1 hour

Observations

bubbles will form from both electrodes, a smell of chlorine will be detectable.

the water will become yellowish.

Testing.

Use pool testing strips to test for chlorine levels.

Use

2 to 3+ table spoons in 5 litres of water.
after about 20 minutes add another half a tablespoon of bleach to water.

1 part bleach to 100 parts water (up to 130 parts water) by volume.

Some slight smell of chlorine should be present in the water, a little stronger than domestic tap water smell.

==========================

addition notes:

pictures and experiment needed

citing and correcting source document. site owner has no operational email address

adapted from:

http://www.pqs.org/ingl.htm

note the website link talks about charcoal , but actually means graphite.

Download a 2 page printable document  bleach making flyer

Bike power: version 2 – field test

Bike power complete. Bike, bike stand, 3 phase rectifier, capacitor,  6 Amp solar battery charge controller, 12V bulb.

Bike power complete. Bike, bike stand, 3 phase rectifier, capacitor, 6 Amp solar battery charge controller, 12V bulb.

The bike ( on a bike stand ) were attached to the 3 phase rectifier and the 1 Farad capacitor to produce 12V DC.

The wheel is a  200 W 36V wheel so the bike could only be operated at a low ( comfortable) speed to prevent too much voltage and too much current.

A 12V 50W dichroic light bulb was added to show it was really working.

capacitor at 13.6 Volts and 50Watt 12 Volt dichroic light working.

capacitor at 13.6 Volts and 50Watt 12 Volt dichroic light working.

PV charge controller added using the bike as the power input instead of the solar panel and battery charger was used.

Probably best for charging a small device unless you want to pedal the bike for a long time.

Future additions:

36 to 12 volt step down for a higher current lower voltage system.

replace the back tire with a smooth tread tire.

PV (solar panel) and charge controller with battery

Depending on where you are you might want electricity.

Solar power is a convenient, low maintenance way to get electricity if you have sunlight.

For this example I will consider a 80W 12 V solar panel and a charge controller capable of 6A at 12 Volts.

The panel

80 W  (maximum power)

12V

P = VxI

P/V =I

80/12 = I

6.66 A =I (maximum current)


The charge controller

12V

6A

P= VxI

P = 12 x 6

P =  72W

Close enough to matched, remember the panel lists it maximum power not typical power rating.

A charge controller is a fancy battery charger which can put unused solar power into stored energy into a battery.

Usually there is a load circuit for things you want to run directly off the solar panel and a battery charging circuit. For this example there is a maximum load of 72 watts from the controller load wires.

For a larger load than the controller allows disconnect the battery from the charge controller and use the charged battery.

There is often a wet type battery for flooded lead acid cells check you documentation as to whether it is connected to the positive(+) or negative (-) terminal of the flooded battery.

A typical arrangement:

PV charge controller and battery wiring diagram.

For 12 Volt setups the car cigarette plug and socket system of connectors is a good idea, simple and common. There is also a wide variety of electrical items made especially for this connector format.


The connectors on solar panels are waterproof, the connections on the charge controller are not, make sure they are waterproofed or kept away from water.

Electrical power: P = V x I

Power for an electrical system is relatively easy to determine.

Power in watts  [J /s ]

Voltage in Volts  [J / C ]

Current in Amps [ C / s ]

P = V x I

But what is power?

Power is energy consumed or release in a given quantity of time.

Power is different from energy as energy is conserved meaning it cant be created or destroyed.

Power can be increased or reduced by altering the amount of time the energy is exerted over.

In the normal mechanical world energy is either potential or kinetic.

Ek = 1/2 m * v²

Ep = mgh

Etot = Ep + Ek

If we consider a ball being raised 1 meter of the ground in a period of 2 seconds and then dropped to the ground reaching the ground in 0.5 seconds, the balls combination of potential and kinetic energy levels remain the same.

However the ball has gained power by expending its energy in a short period of time. this is the subtle difference between energy and power.


Only 1/4 of the power released was used to raise the ball.

Power is simply how quickly energy is stored or expended.

Electrical theory: Basic, the fluid analogy and V = I x R

The easiest way to understand basic electrical theory is to consider the flow of electricity through a wire as being like a fluid flowing through a pipe.

We will consider two reservoirs connected by a pipe with one reservoir being higher from the ground than the other, and a pipe connecting them.

Battery analogy: Fluid moving between reservoirs through a pipe, forced by gravity.

What happens in this situation should be obvious. The fluid will flow until there is no fluid in the top reservoir above the level of the outflow pipe. Flow will be fast at first and close to the end flow will be slow.

The maximum flow will be determined by the diameter of the pipe

Almost the exact same things are observed for a battery.

If we consider pressure the fluid exerts on the pipe it is similar to voltage in an electrical system.

V  measured in Volts    [Joules per Coulomb]

.

The  flow of the fluid in the pipe is similar to the current in an electrical system.

I  measured in Amps  [Coulombs per second]

.

The diameter of the pipe is similar to resistance in an electrical system.

R measured in Ohms Ω  [Joule seconds per Coulomb squared]

.

The total quantity of fluid in the system is similar to total charge in an electrical system.

C measured in Coulombs [ 1 Coulomb = 6.24150965 ×10¹⁸ electrons]

.

This brings us to Ohms law, the most basic law of electronics:

V = I x R

Voltage is equal to current multiplied by resistance.

Warning: The diagram shows a battery in whats called short circuit configuration. short circuits should be avoided as they can lead to dangerous destruction of the battery.

<more to come>

12 Volt DC car adapter plug


The 12 Volt car adapter is a very popular source of DC power so its worth knowing more about its parameters.

12V adapter. positive and negative contacts labeled. Red arrow shows direction of rotation for access to the fuse under the positive contact.

20-25mm in diameter and 50mm long.

Positive contact at the tip and negative contact on the side.

The negative side contacts are usually attached to springs to hold the device secure.

Frequently one of the negative side contacts may be not electrically connected and simply to help hold the device in place.

Under the positive contact there may be a spring and a fuse, which is normally a 2Amp fuse.


Some adapters in this format may support 24 volts as some truck electrical systems are 24 volt.

Scram Bag: Head torch

Once in the dark you won’t be able to easily see what you’re doing. You may have a torch and have the option of holding it in one hand and attempting to do things but this may really get in your way. You may need both hands free. Of course you could hold the torch in you mouth or in the crook of you neck. A simpler solution? A head torch. A head torch frees up you hands an the light is always on the area you are looking at, a lot of problems solved.

A basic single unit head torch with overhead strap and 12 LEDs.

Head torches are basically divided into several categories:

Form factor:

Single strap: A single strap that encircles you head like an elastic headband. Minimalist but not as secure at  the over head strap and not appropriate with heavier lamps.

Over head strap: Like the single strap but with an additional strap that goes over your head to hold the lamp more firmly but at the expense of having to remove other head gear to put it on or take it off.

Single unit: the entire lamp batteries and switch are in one unit at the front.

Separate battery compartment: Batteries are separate to the lamp often at the back to counterbalance the weight of the lamp or possible to be worn on another part of clothing. external battery packs can get in the way and they is always the worry of the wire that connect to the lamp itself getting dislodged or damaged.

Lighting:

The lamps

White/white blue LED : One or more LED in the blue-white spectrum give of a diffuse glow of light extending about 5 meters. good enough to walk an night or fiddle with an object. A single LED can last for a hundred hours of operation for one battery charge.

Red LED: One or more LED in the red spectrum which allows you to intermittently use the LED occasionally without greatly affecting your night vision. Excellent for reading maps at night. Red light does not radiate far and is quite discrete at night, many animals can’t see red light- even at night.

Halogen / high lumen blub: One or more ultra bright focused beams that create a very strong cone of light stretching for 50 or more meters, great for looking at more distant objects at night. These lamps have a tendency to really drain batteries fast. In terms of battery life you are looking at 10-60 minutes of operation.

Ultra violet: I haven’t seen these on head torches yet but if you are a little electrically inclined you might consider adding one. Why? If you are in an area where there might be scorpions like Central Australia, you’ll find out that scorpions and some other insects actually glow under UV light. Pretty handy for avoiding a nasty sting.

Cree LED: Super bright with power consumption similar to a standard LED. The illumination is about 200 lumen ( the combined brightness of 200 candles) They are usually in a focus adjusting tube with a over the head strap configuration .Theses headlamps are new to the market and some are selling at very low prices, get in fast on these they are very good value for money.

Adult scorpions, cat urine and some spiders glow under UV light. http://www.science.widener.edu/~schultz/scorp/scorp.html


Power supply:

Batteries:

Commonly  AAA size batteries are used, sometimes because of the electronic switching involved, rechargeable batteries cant be used.

In higher light output head units CR 123 batteries are often used they are more  expensive, obscure and harder to find that other batteries.

Wind up: if this is the only power supply you will find winding up  a torch a lot gets a bit old really fast and as a consequence the batteries never really get a full charge. Investigate adding an alternative charging modification.

Solar: You will need to leave this in the sun a long time to get the charge required.

External charge plug: Great idea if it can be made waterproof perhaps with rubber cap or similar. Hopefully the charge plug is not really obscure in-case it gets lost.

The switch:

These seem to be more complex than needed. Often there are several light modes switching on various arrangements of LED’s or Lamps and may include a flashing feature. One torch i had had the annoying feature of refusing to respond when at low current forcing the torch into a stay on and go dead mode. the only way to avoid this was to take the batteries out to turn the lamp off.

Other important considerations. The head torch will need to be water resistant at least, preferably waterproof.

Cheap head torches can malfunction quite quickly. I bought two different ones recently that simply didn’t work at all, straight out of the box.

Best advice:

Single unit, using rechargeable batteries, at least 3 White LEDs, simple on/off switch.

Head torch  $15 and upwards depending on features.


OR

Cree LED because of brightness and battery life.

Repair: Examples – Small solar battery block in rain water

I have a bed side lamp I got from IKEA years ago, it’s solar powered with a removable block of batteries. So I did something dumb and inadvertently left the block out in the rain. Thinking the unit was well sealed as I retrieved it it made a sloshing sound, obviously not that well sealed. The 2 slots for the power output of the battery were it’s Achilles heel, and let the water straight in. As I unscrewed the block, water dribbled out of the screw hole, this repair/salvage job started looking dicey. The real risk was if there were complex charging circuits in the block. I finally opened it after almost losing 2 of the 4 screws bouncing on my wood floor.

Solar battery block with 3 x AA (1200mAh?)

After about 5 minutes of using a hair dryer to dry the water away, I discovered there was apparently only a fuse as the sole electronic component. Fuses do tend to survive water quite well.

Quite a relief really. Other things I found out were there were only 3 AA cells (I had guessed 4) and they were stamped with  1200A, I speculate that means 1200mAh, low on the capacity spectrum of rechargeable batteries.

The things you learn once you have the audacity to pop open the case.

Amazingly enough, once dry the unit worked.

Solar lamp in working order

Scram bag: Radio

Got to get information.

Access to information is very important and radio, while an old technology now, is likely to be one of the best sources of information during a crisis. AM radio is a particularly good source because of its range and likelihood of operation.

the DEGEN DE13 world receiver.

DEGEN DE13 Solar / windup/ 5V DC powered. Radio AM FM SW, LED flash light, red flashing LED, USB power output, and alarm.

This is a really great radio, packed with features.

A radio? You may think that because your mobile phone has a radio you’ve got it covered. Well partially. Mobile phones generally only receive FM radio and usually only with headphones attached as they double as the antenna.

FM is a relatively short range radio signal so if you are far from a transmitter you wont hear anything.

AM radio stations use large amounts of power and have large capacitors in order to operate, so that when the power goes off to radio stations FM stations only have generator reserves. AM stations will have a few days of electric reserves in their capacitors on top of generator reserves, so an AM receiver will be more likely to give you information and for longer. AM stations also have much longer range in reception as well.

Shortwave SW radio has enormous range, you’ll realize this when you start hearing languages other than English on them. Shortwave radio receivers are somewhat uncommon these day also.

Powering it.

Solar: A nice little polycrystalline panel.

Wind up: 60 turns of the handle for 1 hour of radio.

AAA cells: 3 AAA cells are an option.

micro USB port: the 5 pin connector, connect to a computer or other 5V DC source.

Lithium battery: Just like what is in cordless phones.

Features:

3 LED light, a pretty good light for shorter range illumination.

Red flashing LED, this is meant to be for reading maps at night, the red doesn’t affect you night vision too much.

Siren: I’m not sure how this is useful but its there.

USB output: I think this runs from the wind up only,  and has output limited to low current for charging older mobile phones or small electronic devices, but better than nothing (though the manual doesn’t specify).

Down sides.

Not waterproof, this can be mitigated buy using a small water proof container or bag.

Not dust proof, if your operating environment is very dusty of silty you could have trouble.

Antenna clasp is a bit fragile, fortunately this is not a critical component.

Battery case cover for the 3xAAA compartment seems a little flimsy.

No clock, one of the few products where the addition of a clock might have made sense, radio shows are scheduled to start at certain times, thought announcers do tend to quote the time often enough.

The instruction manual that comes with this device is pretty vaguely written, a bad translation from Chinese, it’s almost a throw away manual.

There is not form of charge indicator, just  charging LED (green) and a discharging LED (red).


Short wave radio stations sometimes talk about transmitting on X meters rather than a frequency.

This length distance they are talking about is the wave length of the radio wave, wavelength is usually given the Greek letter λ

c is the speed of light in a vacuum 299 792 458 m / s , you’ll notice this number is close to 300,000,000,  300 million or 3 x 10 ^8.

Frequency: f , measured in Hz (Hertz).

For example if someone was transmitting on 19 meters:

c  = λ  *  f

f =  c / λ

f = 300,000,000/19

f = 1,000,000   *  300/19

f = 1,000,000   *   15.79 Hz

f   = 15.79 MHz  (or 15,790 kHz )

This radio can detect that short wave frequency and those between 5.8 MHz and 18.2 MHz (51 to 16.5 meters in wavelength).

It should be noted that some SW bands are not in the frequency region where they should be due to some historical conventions.


Radio frequency notebook

You should create a series of notebook entries listing for each location you plan to be in which frequencies are operational and what type of information is given.

ie

location 1

AM  frequency  information types

station 1             music and hourly news

station 2             news and weather (mostly prerecorded)

FM  frequency  information types

station 3        music  (infrequent news)

SW frequency  information types

station 4        Chinese language (shipping?)


A great deal of information can be inferred from which stations are still broadcasting also with what information they are giving.


This handy radio comes in several colors; dark green(pictured), lime green fluoro, and white, though I’m sure almost any color is possible

Can be bought from many internet sellers for about $30.

Bicycle Power

200W 3 phase powered bike hub, 2x BR 354 rectifiers, 12 V 1 Farad capacitor, 12V lamp.

the picture is a gif animation click on it to see.

So me and a mate managed to get hold of some powered bicycle hubs. They are basically a 3 phase alternator built into an over size axle hub. Of course you can reverse the process and instead of adding electricity to get wheel rotation, you can spin the wheel and get electricity. The 3 phase AC needs to be rectified and smoothed a little with a capacitor (3 phase is smoother than single phase however).

The light pulses because the wheel is not constantly spinning. we later figured out we had wired up the capacitor backwards.

The work continues.

The original bulb pictured was an incandescent  indicator lamp from a car, essentially a tiny 12V light bulb. After some slightly energetic riding it actually burnt out, after glowing quite bright.  I estimated we were able to put 21W through the setup safely thought it (by pedaling slowly in top gear) though the bike is capable of a lot more.

The electrical diagram of the bike powered the light bulb.