Self watering plant pots AKA wicking barrel

This video tutorial explains how to make a self watering barrel.


One of the common problems novice gardeners have is knowing how much to water their plants.

Too little water and they wither and die, too much water and the root can begin to rot. Either way the result is bad and means reduced crops which is a really big problem, especially if you are relying on them for food.

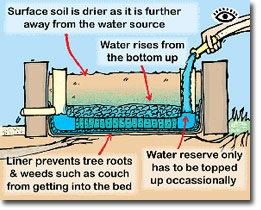
This watering barrel which you can make your self with simple tool  and techniques allow the water to ‘wick’ from a reservoir at the bottom of the barrel. The design also incorporates an overflow for the reservoir about 0.3m (12 inches) from the bottom to prevent the soil becoming too wet (waterlogged).

Other features is that the plant is raised above ground level and can have netting added to prevent animal eating or destroying crops.

Diagram of a cutaway to further explain wicking barrel.

Diagram of a cutaway to further explain wicking barrel.


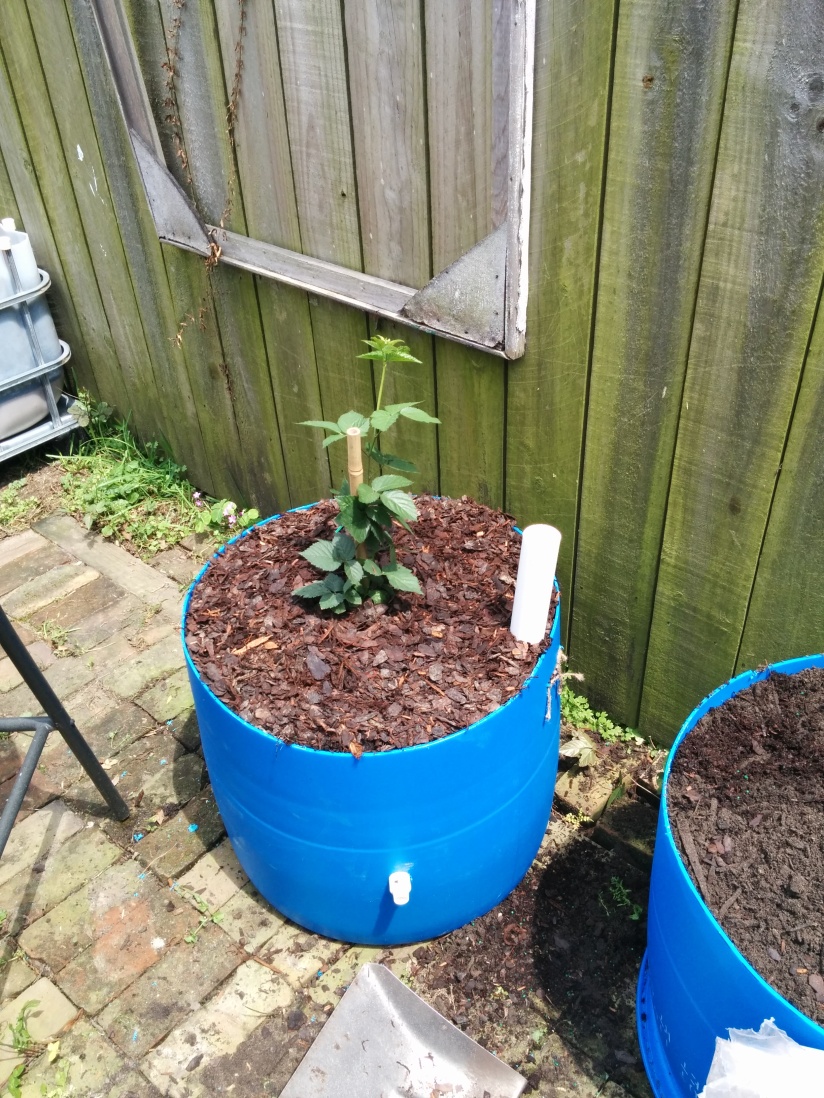
Completed wicking barrel

Completed wicking barrel


The inlet pipe can be connected to a rain water collection system without fear of over watering.


the only thing i might add to this design is bare copper wire around the outside of the barrel to deter snails and slugs form entering the pot. The copper itself can also treat some micro-nutrient problems plants may develop.
Scram bag: Char cloth tin

Char cloth is one of the easier was to turn a spark into an ember, which of course can be turned into a flame.

To make the char cloth you will need a char cloth tin.

A great source of char cloth tins are empty nugget tins, though other well sealing tins can be used.

Kiwi boot polish tin.

Make char cloth tin:

1) Remove all paint from the tin with sand paper. (otherwise it will stink as it is heated)

2) Make a small vent hole 2-3 mm diameter (perhaps with a nail) in the top of the tin.

Use of char cloth tin:

1) Add small pieces of cut up natural cloth (20 mm square) into the tin and close it. (wood or paper can also be used)

2) Place tin on the embers of a fire with the vent  hole facing up.

3) Wait for smoke to come from the tin, and wait for the smoke to stop.

4) Turn the tin over so the vent hole faces down. ( this allows both sides of the cloth to char properly)

5)Wait for smoke to come from the tin, and wait for the smoke to stop.

6) Remove tin from the embers and allow to cool.

7) Open to inspect the char cloth.

Char cloth quality tests:

If  it is brown it need to be cooked longer.

If it is crumbly too the touch  it was cooked too long and must be discarded.

It should be black and soft but not too fragile.

Store the char cloth in an air tight container. A small piece of tape or bees wax over the vent hole may be enough.

Char cloth use:

Place char cloth in your fire starting kindling nest and place char cloth in the center.

Using what ever method you have of creating a spark, attempt to create sparks on the char cloth.

The cloth will smolder with red orange ember lines flowing through the material. blow on it gently in the kindling nest and flames should take hold.

Fun facts about kiwi boot polish:

Invented in Melbourne, Australia by Scottish immigrants, Made in Indonesia, and now owned in USA.

The US army just calls it Kiwi, just like they call the fruit a Kiwi.

Connection to new Zealand? One of the inventors wives was from New Zealand.

Allegedly this boot polish cemented the Kiwi as a symbol of New Zealand.

http://www.enotes.com/topic/Shoe_polish

Cost: free* ( Some assembly required.) or possibly free with nugget for your boots.

Scram Bag: Sparking iron for fire lighting.

Not quite as primitive, difficult or slow as using friction on sticks.

Just get two lawn mower blade replacement tips heat them to red hot in a fire, if possible hammer them flat (the iron will be a lot softer when it is red hot), and allow to cool in the air.

The iron is now spark ready.

Welcome to the Iron age guys…

The blade tips don’t need to be new so they can be a re-use of a would be discarded item

Conveniently the pieces already have holes drilled in them so you can attach them together with a string/leather strip so you can keep them as a pair.

A with any other spark throwing device you will need to have a tinder birds nest ready to catch the spark.

This fire lighter will last a lifetime and if they get rusty you can just heat them again in the fire to remove the rust.

Alternate uses: could also be used as somewhat crude knives.

A large stack of lawnmower blade replacement tips. Made from carbon (mild or spring) steel.

Caution: If you are  working on or removing any part of a lawn mower blade, make sure the spark plug is disconnected and the blade cannot move.

Place large wooden objects into the path of the blades so in case they move you won’t loose a hand or finger(s). obviously its going to be hard to use a pair of sparking irons if you are missing hands or fingers.

Cost: free if you know where to look, other wise about $10 per pair.

Resource Challenge, Car

We will be having a series of challenges based on a given real word resource.

The challenge is finding as many alternative uses for it and how many resources can be extracted from it.

Abandoned car, ran out of petrol, otherwise in working order.

I’ll list as many things a I can think of and challenge other readers to think of others.

I’ll look at sudden collapse first:

Add fuel and drive away.

A home for the night or maybe longer.

A source of fuel:It may be possible to siphon out the last remaining fuel.

use a copper spike (non sparking) to puncture the bottom of the tank and extract fuel from underneath.

fluids in a car:

detergent in window wiper containers. oil in sump, brake/hydraulic fluid, water/ ethylene glycol in radiator.

useful engine parts: engine bay

battery, alternator, radiator: can be use as heat exchanger, rubber belts, electrical wiring, electric motors and pumps, engine controller electronics.

car interior:

seat belts, cloth from ceiling, screws from holding plastic moldings together, springs from seats.